Teaching Your Dog to Stand Still for Grooming and Brushing: A Comprehensive Guide from Dr. Edward Hale
Hello fellow pet parents! Dr. Edward Hale here, your trusted veterinarian with over 15 years of experience helping families and their beloved animal companions. Today, we're diving into a topic that often causes a lot of stress for both dogs and their humans: teaching your dog to stand still for grooming and brushing. While it might seem like a simple task, for many dogs, the clippers, brushes, and even just the sensation of being held can be incredibly intimidating. But I promise you, with patience, positive reinforcement, and the right approach, you can transform grooming time from a wrestling match into a bonding experience.
Regular grooming isn't just about making your dog look good; it's a vital part of their overall health and well-being. Brushing helps to remove loose fur, prevent mats, distribute natural oils for a healthy coat, and allows you to inspect their skin for any unusual lumps, bumps, or parasites. Nail trims prevent painful overgrown claws, and ear cleaning can help stave off infections. However, if your dog isn't comfortable standing still, these essential tasks become incredibly difficult, stressful, and even dangerous for both of you. My goal today is to provide you with a comprehensive, phase-by-step guide on how to teach a dog to stand still for brushing and other grooming activities, making the process safer, more pleasant, and ultimately, more effective.
Why Is Standing Still So Hard for Dogs? Understanding Their Perspective
Before we jump into training, it's crucial to understand why your dog might resist standing still. It's rarely out of defiance and almost always rooted in discomfort, fear, or a lack of understanding.
- Lack of Exposure: Many dogs, especially those adopted later in life, simply haven't been desensitized to handling and grooming tools from a young age.
- Fear of the Unknown: The sound of clippers, the feel of a brush, or even the height of a grooming table can be frightening if it's new or presented improperly.
- Past Negative Experiences: A painful nail trim, a rough brushing session, or an accidental nick can create a lasting negative association.
- Discomfort or Pain: Underlying skin conditions, matted fur being pulled, or joint pain can make standing still or being touched incredibly uncomfortable.
- Natural Instincts: Dogs are often not accustomed to being held still against their will. Their natural instinct when scared or uncomfortable is often to move away or flee.
- Lack of Training: Quite simply, they may not understand what you want them to do. They haven't learned that standing still brings rewards.
The Benefits of a Calm Grooming Routine
A dog that calmly stands still for grooming benefits in numerous ways:
- Improved Health: Regular grooming prevents skin issues, mats, and allows for early detection of health problems.
- Reduced Stress: For both you and your dog, a calm grooming session is far less stressful and anxiety-inducing.
- Enhanced Bond: Gentle handling and positive experiences during grooming can actually strengthen your relationship.
- Safer Experience: A still dog is less likely to be accidentally cut or injured during nail trims or brushing.
- Cost Savings: Regular at-home grooming can reduce the frequency of professional grooming visits for basic maintenance.
Let's begin our journey toward a more harmonious grooming experience.
Essential Tools and Environment Setup
Before you even begin training, ensure you have the right setup:
- Grooming Area: Choose a quiet, well-lit, non-slip surface. A sturdy table with a non-slip mat is ideal for smaller dogs, while larger dogs might be groomed on the floor. Avoid surfaces where your dog might slip and feel insecure.
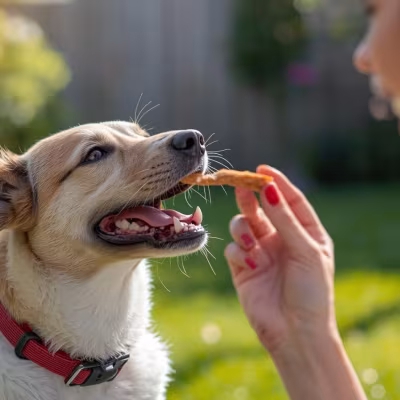
- High-Value Treats: These are critical. Think small, soft, super-tasty treats your dog absolutely adores (e.g., bits of cheese, cooked chicken, peanut butter on a spoon).
- Appropriate Grooming Tools:
- Brush: Select a brush suitable for your dog's coat type (e.g., slicker, pin brush, deshedding tool).
- Comb: A metal comb is essential for checking for tangles.
- Nail Clippers/Grinder: Choose the type you're most comfortable with.
- Ear Cleaner & Cotton Balls: If needed, recommended by your vet.
- Non-Scented Wipes: For quick clean-ups.
- Leash/Harness (Optional but Recommended): For safety on a grooming table, a grooming arm with a loop or a secure leash can help keep your dog in place without forcing them. Never leave your dog unattended on a grooming table, even if secured.
- Patience and Time: This isn't a race. Short, frequent sessions are far more effective than long, infrequent ones.
Step-by-Step Guide: Positive Reinforcement Dog Grooming Training
The key to success here is positive reinforcement and gradual desensitization. We want to build positive associations with every aspect of grooming.
Phase 1: Building a Positive Foundation (The "Happy Handling" Phase)
This phase is all about making handling a wonderful experience, without any grooming tools present.
- Start Small: Begin in a calm environment. Sit on the floor with your dog.
- Gentle Touches: Briefly touch your dog in areas they normally enjoy (e.g., chest, shoulders). The moment you touch them, give a high-value treat.
- Gradual Progression: Slowly start touching less preferred areas for a second, then treat. This might be a leg, a paw, their tail, or around their ears. Aim for very brief touches at first.
- Pairing with a Cue: Once your dog is comfortable with brief touches, introduce a verbal cue like "Stand" or "Stay." Say the cue, gently guide them into a standing position (if they aren't already), hold for a second, then immediately treat and release.
- Increase Duration: Gradually increase the time you touch them and the duration they stand still before giving the treat. Remember, tiny increments are key. If they pull away, you've gone too fast. Go back to an easier step.
- Practice Daily: Do this for 2-5 minutes, multiple times a day. Keep it positive and end on a good note.
Phase 2: Introducing the Grooming Tools
Now that your dog is comfortable with handling, it's time to make friends with the tools.
- Visual Introduction: Simply bring out the brush, clippers (unturned on), or nail grinder. Let your dog see it, sniff it. Reward them for calm curiosity. Don't force interaction.
- Sound Association (for clippers/grinders): Turn on the clippers or grinder away from your dog. As soon as you turn it on, give a treat. Turn it off, no treat. Repeat. This creates a positive association with the sound. Gradually move the tool closer while it's running, always rewarding calmness.
- Gentle Contact: Once your dog is comfortable with the sight and sound (if applicable) of a tool, gently touch them with the brush or dull side of the clippers. Just a light touch, then immediately treat.
- Focus on Positive Feelings: The goal here is not to groom, but to make the tool's presence and light touch a good thing.
Phase 3: Building Duration for Standing Still
This is where we refine the "stand still" command in the grooming context.
- Cue and Stand: Ask your dog to "Stand" in your chosen grooming spot. Reward immediately for compliance.
- Add Your Hands: While they are standing, gently place your hands on their body, as if you were about to groom. Reward.
- Increase Time: Gradually increase the duration you have your hands on them, and the time they are standing still, before giving the treat. If they shift or move, gently reset and try again for a shorter duration.
- Use a "Release" Word: Once you're done with a segment, use a clear release word like "Okay!" or "Free!" This signals they can move and helps them understand the expectation for stillness.
- Incorporate the Grooming Loop (if using): If you plan to use a grooming loop on a table, introduce it now. Loop it loosely around their neck (ensure it's safe and snug enough not to slip off, but not tight). Reward. Gradually increase the time they wear it while standing.
Phase 4: Adding Brushing and Grooming Actions
Now, we combine standing still with actual grooming.
- One Stroke, Then Treat: Ask your dog to "Stand." Give one gentle brush stroke on an easy area, then immediately treat.
- Two Strokes, Then Treat: Gradually increase to two strokes, then three, always treating after the desired number of strokes while they remain still.
- Vary Body Parts: Move from easy areas to more sensitive ones (legs, belly, tail, head) in tiny increments. Always return to an easy spot if they show discomfort.
- Introduce Other Tools: Once brushing is comfortable, introduce the nail clippers or grinder using the same one-action-then-treat method. Clip one nail tip, treat. Gradually increase.
- Short Sessions: Keep sessions very short, 2-5 minutes max, especially at the beginning. You want to always end on a positive note, leaving your dog wanting more.
- Consistency is Key: Regular, short training sessions are far more effective than infrequent, long ones. Aim for daily practice.
Phase 5: Practice and Generalization
Once your dog is comfortable with basic grooming in one spot, expand their comfort zone.
- Different Locations: Practice in different rooms of your house.
- Different People: If others will be grooming your dog, have them participate in the training.
- Simulate Real Grooming: As your dog progresses, you can start to do more consecutive grooming actions before treating, always being mindful of their comfort level.
Remember, patience is your best tool. If your dog shows any signs of stress – licking lips, yawning, turning head away, "whale eye" (showing the whites of their eyes), growling, or snapping – you've moved too fast. Go back to an easier step where they were comfortable.
Common Mistakes to Avoid When Training an Anxious Dog for Grooming
Even with the best intentions, it's easy to fall into common traps that hinder progress:
- Forcing or Restraining: Physically holding your dog down against their will creates fear and can lead to aggression. This is the fastest way to make them hate grooming.
- Rushing the Process: Trying to do too much too soon will overwhelm your dog and create negative associations. Take your time.
- Punishment: Never scold, yell at, or punish your dog for wiggling or resisting. This only increases their anxiety and fear of grooming.
- Inconsistent Training: Sporadic training or varying your methods will confuse your dog and slow down progress. Consistency is vital for successful positive reinforcement dog grooming training.
- Using the Wrong Tools: An uncomfortable brush or dull clippers can cause pain and instantly set back your training. Ensure your tools are appropriate and in good condition.
- Ignoring Body Language: Failing to notice subtle signs of stress (lip licking, yawning, stiff body, averting gaze) means you're pushing your dog past their comfort zone.
- Not Using High-Value Rewards: If your dog isn't motivated by the treats, they won't see the value in cooperating. Find what truly excites them.
Pro Tips from Dr. Edward Hale's Veterinary Experience
Having seen countless dogs (and owners!) struggle with grooming, I've gathered a few insights that might help:
- Start Young with Puppies: If you have a puppy, start immediately! Gentle handling, touching paws, ears, and mouth, and short brushing sessions are vital for making grooming enjoyable for puppies. The earlier you start, the easier it will be throughout their life.
- The Grooming Table Advantage: For many dogs, being elevated on a non-slip grooming table provides a clear boundary and makes it easier for you to reach all areas without bending over excessively. It also signals that "this is grooming time." Just ensure it's always a positive experience on the table.
- Lick Mats & Enrichment: For dogs who are a little anxious but not overtly fearful, a lick mat smeared with peanut butter or a soft treat can be a fantastic distraction and positive reinforcer during shorter grooming tasks like brushing. It keeps them engaged and happy.
- "Happy Visits" to the Vet/Groomer: If your dog is particularly fearful of the vet or groomer's office, arrange "happy visits." Go in just to say hello, get a treat from the staff, and leave. No pokes, no prods, just positive associations. This can help with preventing fear during at-home dog grooming as well, as they learn that specific environments aren't always scary.
- Desensitizing Dogs to Grooming Tools: Don't just show them the tool; let them interact positively. For instance, for the brush, rub it gently on your arm first, then briefly on their back, followed immediately by a treat. Make it a game.
- Professional Help for Matting: If your dog has severe matting, please do not attempt to brush it out yourself. This is incredibly painful and can traumatize your dog. A professional groomer or vet can humanely shave down the mats, often requiring sedation for the dog's comfort and safety. This is one of those times when professional intervention is paramount for their well-being.
- Consider Calming Aids: For extremely anxious dogs, discuss calming aids with your vet. This could range from pheromone diffusers (like Adaptil) to veterinarian-prescribed anti-anxiety medications. These are not a substitute for training but can help reduce anxiety enough for training to be effective.
When to See a Vet
While this guide focuses on positive training, there are times when a veterinary consultation is essential:
- Extreme Fear or Aggression: If your dog growls, snaps, bites, or becomes extremely panicked during any grooming attempt, it's crucial to consult your veterinarian or a certified professional dog trainer/behaviorist. This could indicate severe anxiety that requires a tailored behavior modification plan, potentially alongside medication.
- Signs of Pain: If your dog consistently reacts to touching a specific area, limps, whines, or cries during handling, they might be experiencing pain. This could be due to arthritis, an injury, or an underlying skin condition. A vet can diagnose and treat the source of the discomfort.
- Skin Issues: Persistent itching, redness, sores, lumps, or unusual hair loss should always be checked by your vet. Grooming can exacerbate these issues if not properly addressed.
- Severe Matting: As mentioned, severe matting can cause skin irritation, infections, and restrict movement. Attempting to brush it out at home will be very painful. Your vet can safely sedate your dog for a humane shave-down if necessary.
- Difficulty with Nail Trims: If you consistently cut too deep or your dog is terrified of nail trims, your vet or a professional groomer can safely perform them and offer guidance on reducing anxiety.
- Sudden Behavioral Change: A sudden aversion to grooming in a previously tolerant dog can sometimes signal an underlying health issue.
FAQ: Common Questions About Training Your Dog to Stand Still for Grooming
Q1: How long does it take to train a dog to stand still for grooming?
A: The timeline varies greatly depending on your dog's personality, past experiences, and your consistency. For a puppy starting fresh, it might take a few weeks to build a good foundation. For an adult dog with negative associations, it could take several months of consistent, positive training. The key is patience and not rushing the process. Celebrate small victories, and remember that training is an ongoing journey, not a destination.
Q2: What if my dog is already an adult and hates grooming? Can they still learn?
A: Absolutely! It might take more time and patience, but adult dogs are perfectly capable of learning new associations. You'll need to go back to the very basic steps of desensitization and positive reinforcement, potentially starting even smaller than with a puppy. Focus heavily on high-value treats and keeping sessions extremely short and positive. For severe cases, professional help from a veterinary behaviorist or certified dog trainer is highly recommended to create a tailored behavior modification plan, especially for training an anxious dog for grooming.
Q3: Can I use sedatives to make my dog stand still for grooming?
A: Sedatives or anti-anxiety medications should only be used under veterinary guidance. They are generally considered a temporary aid to help reduce anxiety enough for successful training or for necessary procedures, not a permanent solution or a substitute for positive reinforcement training. They address the anxiety but don't teach your dog to enjoy the process. Discuss options with your vet; they might recommend them in conjunction with a behavior modification plan or for specific, stressful events like a professional shave-down for severe matting.
Q4: What if my dog bites or nips during grooming attempts?
A: A bite or nip is a serious warning signal that your dog is incredibly uncomfortable or fearful. Do not scold or punish them, as this will only escalate their anxiety and potentially worsen the behavior. Immediately stop the grooming attempt and assess what triggered the response. If your dog is biting, it is crucial to seek professional help from your veterinarian or a certified professional dog trainer/behaviorist. They can help you understand the root cause of the aggression and develop a safe and effective plan to address it, prioritizing safety for both you and your dog. You might need to use a muzzle for safety during future attempts, but only under expert guidance and after proper muzzle conditioning.
Conclusion
Teaching your dog to stand still for grooming and brushing is one of the most valuable investments you can make in their long-term health and your relationship. It might require effort, patience, and a whole lot of treats, but the payoff is immense: a calmer, happier dog, a safer grooming experience, and a stronger bond built on trust. By following this step-by-step guide for dog grooming posture and always prioritizing your dog's comfort and safety, you'll be well on your way to making grooming a positive ritual instead of a dreaded chore. Remember, I'm always here to support you and your furry family members, so don't hesitate to reach out to your veterinarian if you encounter any significant challenges. Happy grooming!

0 Comments
No comments yet. Be the first to share your thoughts!
Leave a Comment